Last edited: 27 May 2024.
Introduction
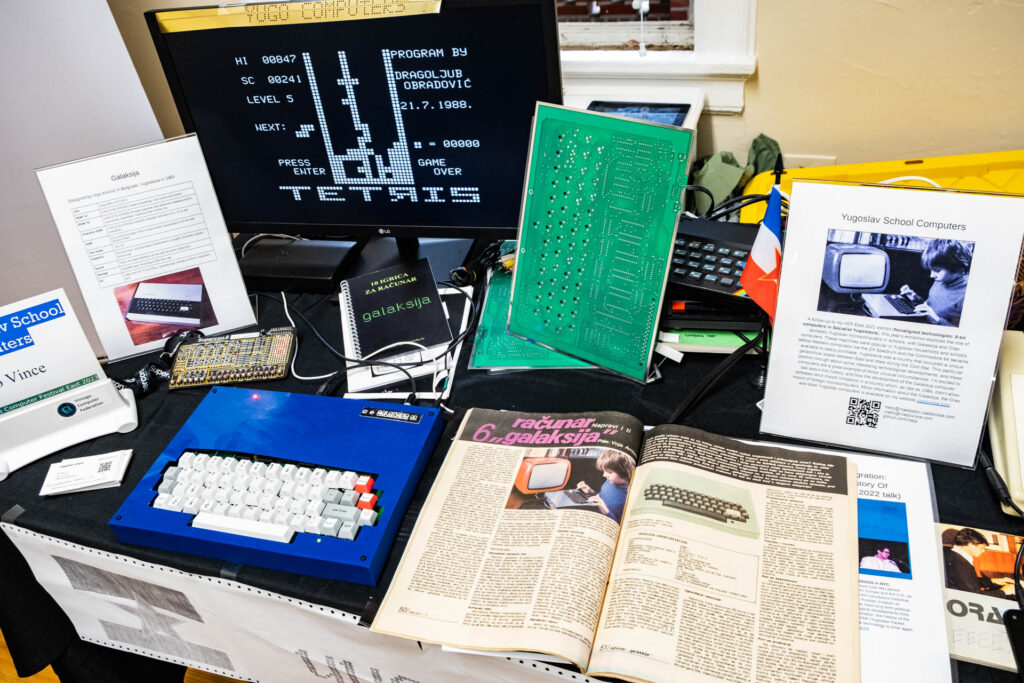
Galaksija is a Z80A based microcomputer designed in 1983 in Belgrade (Yugoslavia, now in Serbia) by Voja Antonić. I’ve been documenting, exhibiting and speaking about the Galaksija ever since I assembled my first one in 2020.
If this is your first time hearing about the Galaksija, I recommend you check out my three posts telling the story of the Galaksija:
- Building A Galaksija, Part I: The Tech
- Building A Galaksija, Part II: The Origin Story
- Building A Galaksija, Part III: Audio Cassettes, Magazine Listings And Radio Waves
This post includes many resources and references if you are building one of your own, or if you’re just interested in learning more about this fascinating machine. Many of these resources are also featured on my Galaksija github repo.
Sections:
- Board design and gerber files
- Other Galaksija designs
- Galaksija boards to order
- Bill of materials (parts list)
- Instructions
- Schematic
- Roms
- Video output
- Power supply
- Software and tape loading
- Emulators
- Memory map
- Case
- Key switches
- Keyboard plate
- Expansions
- Common problems
- Galaksija builds
- Galaksija Plus
- Additional resources
Board design and gerber files

The single layer PCB design of the Galaksija was originally published in 1984 Računari u vašoj kući magazine on page 56 (page 8 of the pdf). While most folks ordered their boards from the magazine, a complete board could be made from the copy included in the magazine. While you can still make your Galaksija using this same design (like I did!), there is now a double layer design gerber published by Voja Antonić, Galaksija’s creator. However, there are many other single layer gerbers going around the internet. I will summarize the different versions below
1983 single layer board
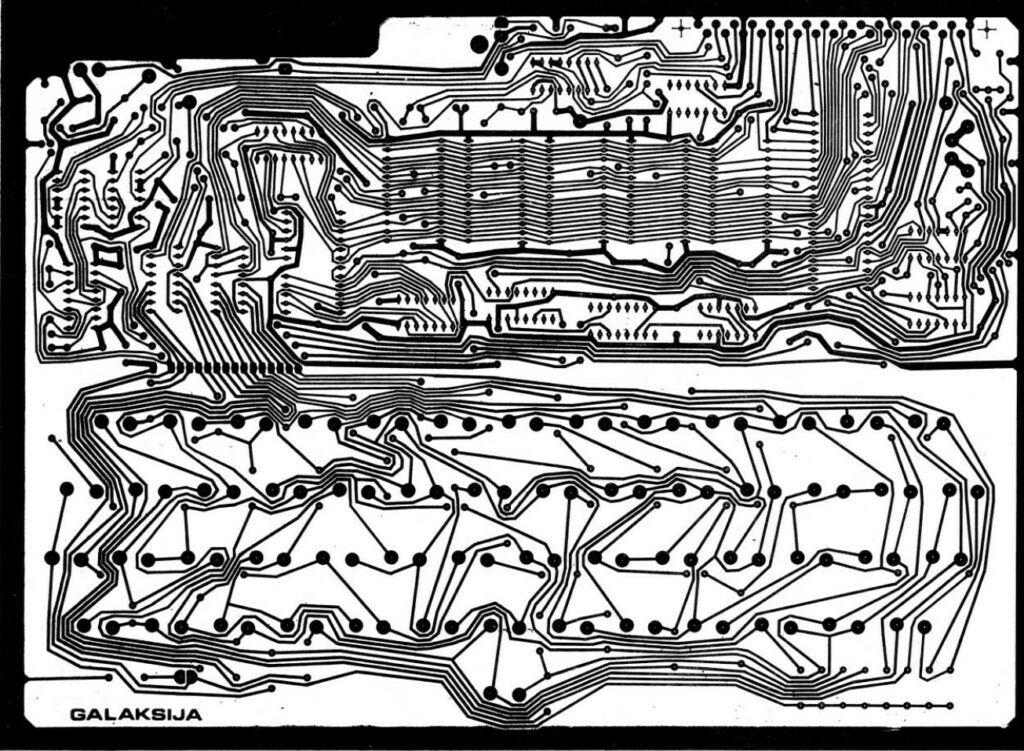
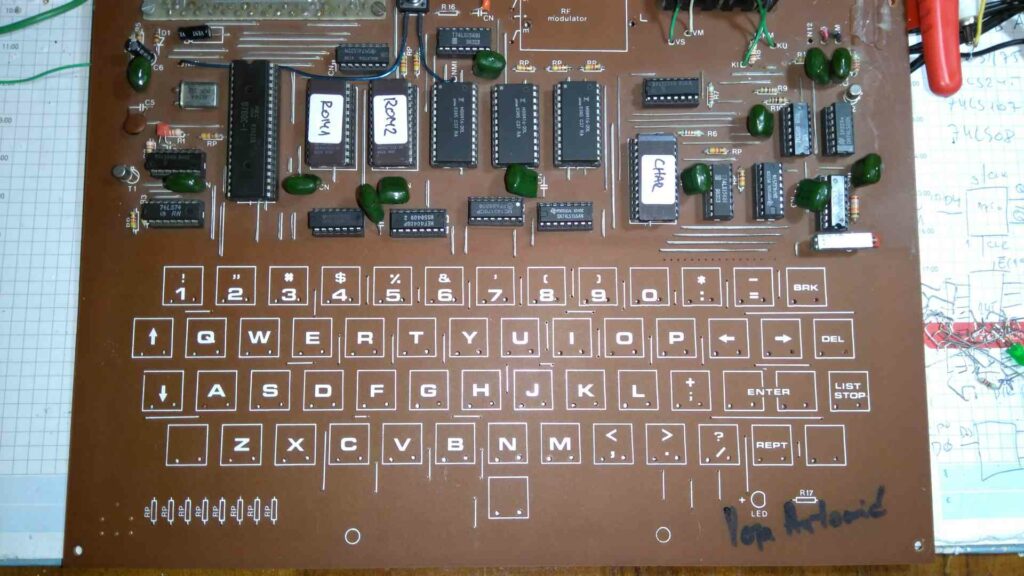
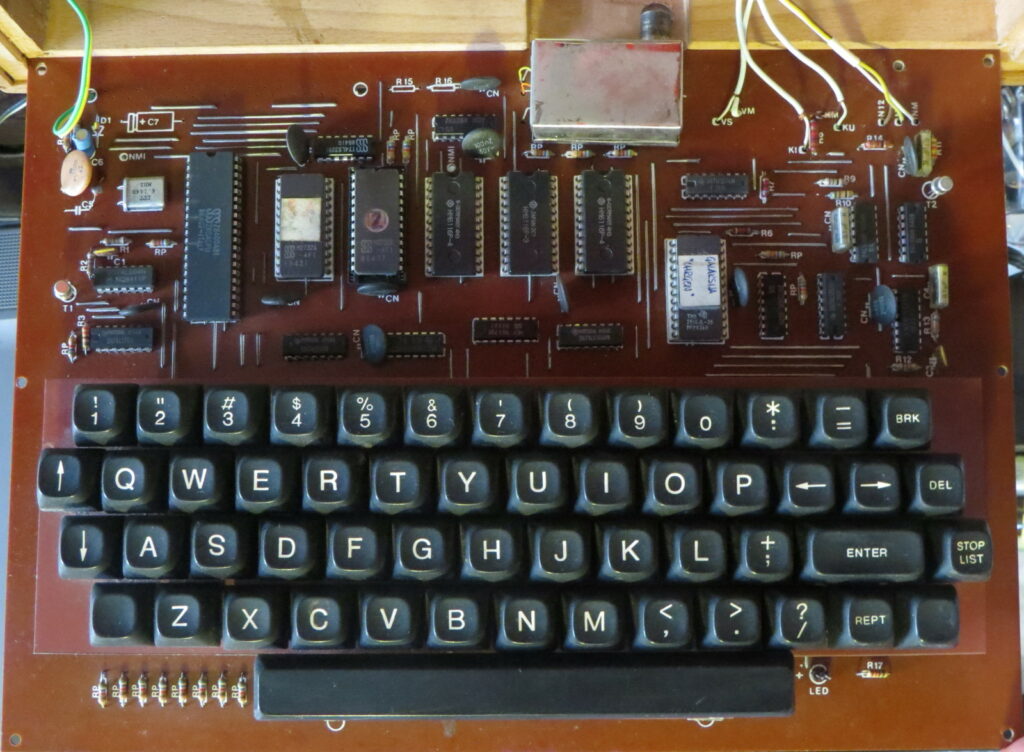
The original board was published in Računari u vašoj kući magazine in January 1984. While most folks ordered these boards from the magazine, the print could be used to manufacture a board yourself. The print was in 1:2 ratio. It was a single layer board with 119 jumpers, and it was compatible with SMK style key switches.
2020 double layer board


Voja Antonić, Galaksija’s designer, released an updated double layer PCB back in 2020. The 2020 double layer PCB includes all the connections that had to be manually made with jumpers on the original single layer PCB. It also includes updated key switch connectors and drill holes compatible with Cherry MX switches, and a new 5nF ceramic capacitor added between RFSH and GND on Z80A (alternative values like 3nF might work better, see below for common problems). This solves the problem of modified timings on the CMOS version of Z80A. You can download the double-layer PCB from Hackaday.
Single layer board gerber versions


Demerzel gerber
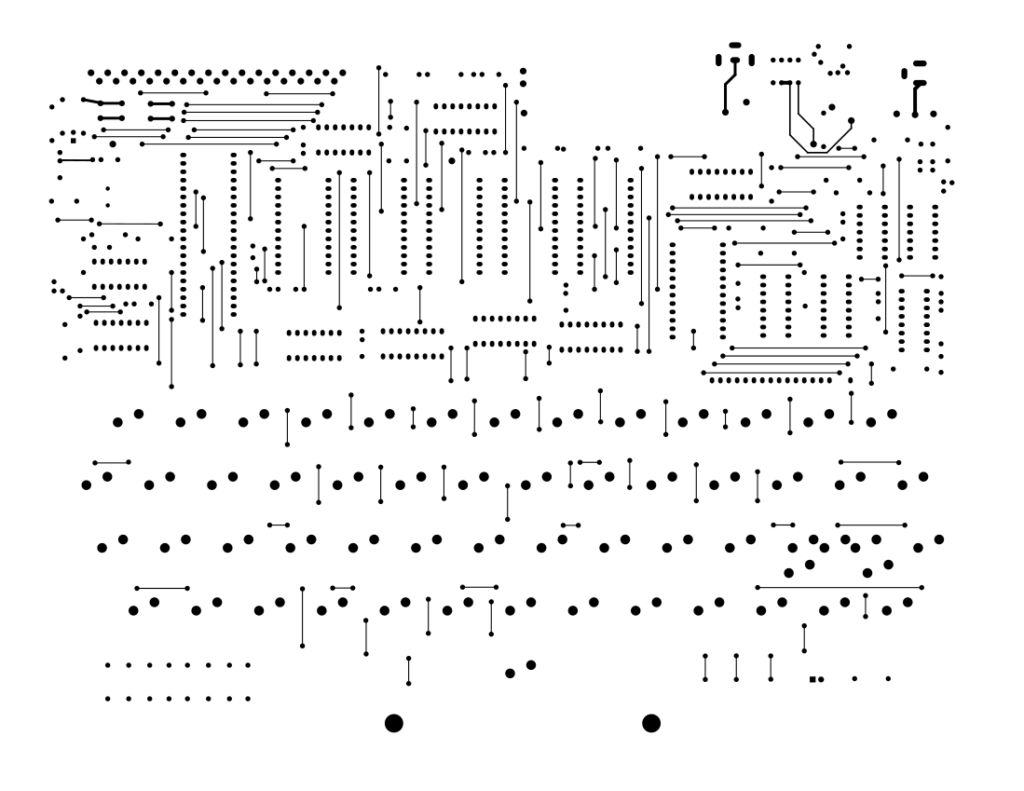
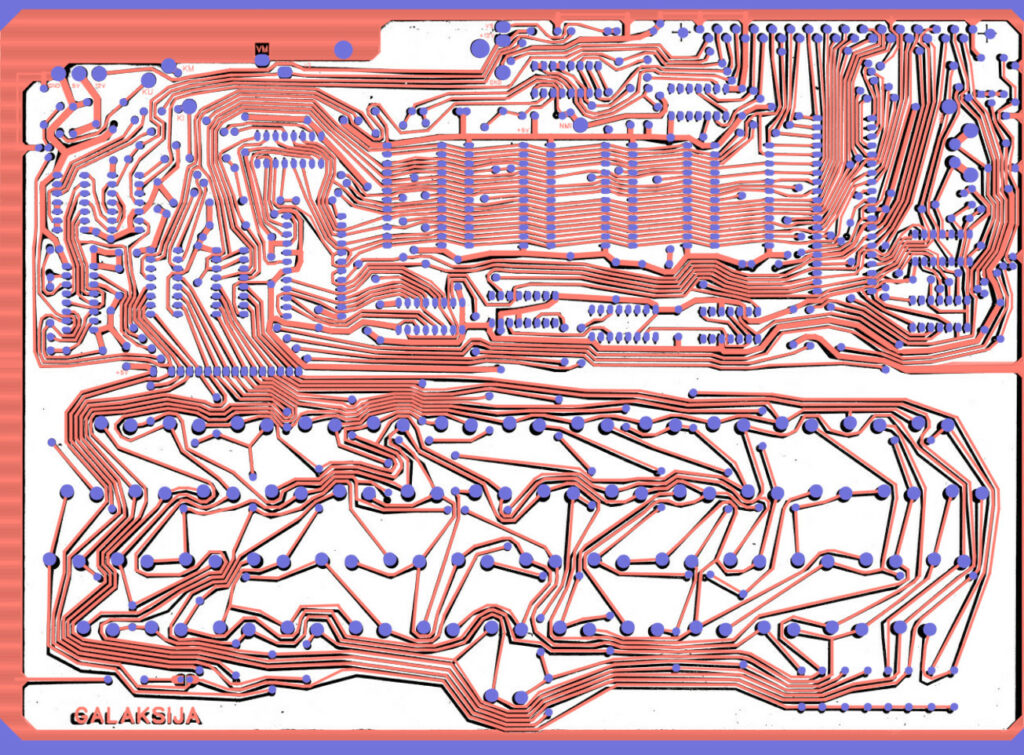
Gerber file of the original single layer board was originally published by demerzel on forum.benchmark.rs who made it by scanning the original board design from Računari u vašoj kući. You can get that gerber here. Note that since this is a single layer board, you will have to solder 119 jumpers, and the connector and drill hole locations are not compatible with modern key switches, so you will have to source older switches (SMK J-M0404 compatible), and possibly drill the key connector holes to widen them (see the key switches section for details). This gerber is a great reproduction of the original board design, as you can see in this comparison below where the gerber is outlined in red and purple, over the scan from the magazine in black:
Demerzel’s gerber was later repackaged (possibly with some minor edits) and made available at spetsialist-mx.ru. That URL is no longer active, but a mirror can be found at http://www.специалист-пк.рф/Galaksija. The gerber is pretty much the same as the demerzel version, including the connectors for old style SMK key switches. You can download it here.
Galaksija tlm 092013 (single layer gerber with MX switches)

Demerzel at the forum.benchmark.rs put together a version of the single board gerber with MX compatible keyboard connectors. The top part of the board is the same as the demerzel/spetsialist-mx.ru version, but the bottom (keyboard) has been changed to fit MX key switches. Note: this gerber does not include drill holes for the MX key switch mount holes, so you will either have to add the holes to the gerber or drill them. You can download it here.
Other Galaksija designs
There are other Galaksija compatible designs that have been made by other folks over the years. Here are a few that I’m aware of:
- Galaksija 2024 – a 40th anniversary Galaksija designed by Voja Antonić, featuring compact design, an EEPROM for storage and a UART for communication
- Nova Galaksija (“New Galaksija”) – Zoran Bošković’s Galaksija design from 2004 that doesn’t include a built in keyboard and fits the whole design on a small PCB. Josip Perušanec designed additional improvements for this Galaksija including better graphics, IDE interface and sound chip. Schematics are available on the archived spetsialist-mx.ru.
- Galaksija Plus – Galaksija Plus was an improved Galaksija design by Nenad Dunjić, Milan Tadić and Nenad Balint in 1985, it included popular expansion projects like the expanded memory, sound support and improved graphics. Folks at spetsialist-mx.ru designed a clone of the Galaksija Plus. The design files are unfortunately no longer available, but luckily Retro Bertie on YouTube uploaded them to Google Drive. Retro Bertie has a great video about building a Galaksija Plus clone. Fixes cited in this video were developed by Goran Stanković. More information about the Galaksija Plus is available in the Galaksija Plus section below
- CMOS Galaksija – Tomaž Šolc’s remake of the original circuit using modern 74HC-series chips. Tomaž wrote his Master Thesis about this project
- µGalaksija – an FPGA Galaksija designed by Dušan Grujić i Dragan Toroman
- Galaksija FPGA for ZXUno – FPGA Galaksija implementation for the ZXUno
Galaksija boards to order
There are currently (2023) two webshops with Galaksija boards available to order:
- galaksija.org.rs, associated with the Galaksija documentary project, has Voja Antonić’s 2020 double layer boards available for €35
- Apulia Retrocomputing has single layer boards available for €29.90
Bill of materials (parts list)
I created a spreadsheet with all the parts necessary to build a Galaksija, with links and prices. This spreadsheet includes separate BOMs for the single layer and the 2020 double layer PCB designs.
Note: this file is not actively maintained and you should check availability before ordering.
Instructions
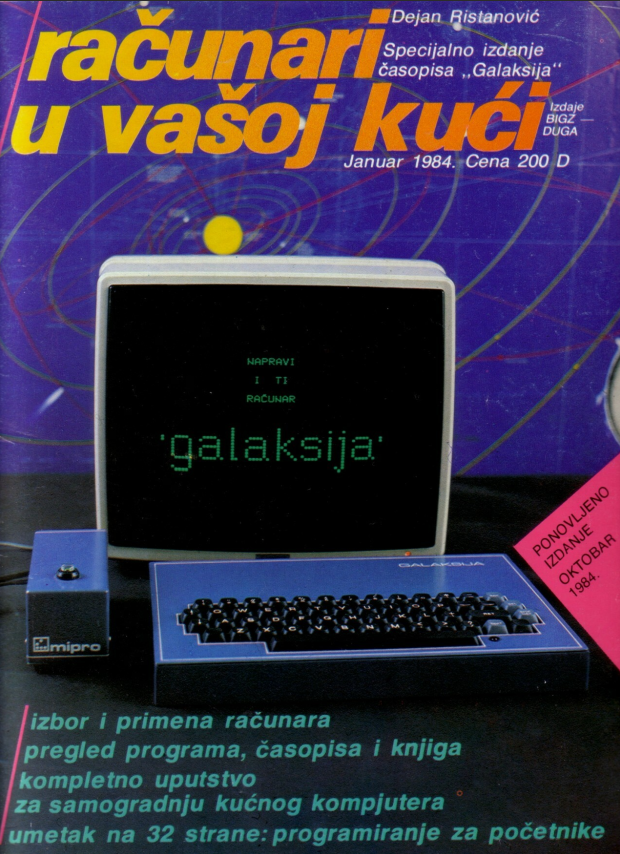
Instructions for building the Galaksija computer were first published in the January 1984 special edition of the Yugoslav popular science magazine Galaksija, titled Računari u vašoj kući (Computers in your home). These instructions are still valid and they are the best resource if you want to build a Galaksija yourself. This translation was published in PoC——GTFO, Volume 2 published by No Starch Press in 2018. This translation is kindly provided by Travis Goodspeed and Aleks Nikolić.
Schematic

The original instructions in Računari u vašoj kući included the full schematic for building a Galaksija. While you can find this on page 53 (page 5 of the PDF) of the untranslated original guide, the English translation does not include the schematic. I’ve included both the original scan from the magazine, and the modern recreation by “fifan” from spetsialist-mx.ru:
Note: the schematic from Računari has the resistors R9 (62 ohm) and R10 (50 ohm) flipped. I’ve corrected the version attached here to show the correct connections. You can find the unedited schematic with the error in the Računari guide. Big thanks to Walter Miraglia for spotting this!
Roms
There were 3 roms for the original Galaksija
- 2 x 2732 4KB EPROMs: ROM A (main functions and BASIC) and ROM B (advanced math functions, released in 1984)
- 1 x 2716 2KB EPROM: character generator rom
Later on at least two additional roms were released, mainly for use with Galaksija Plus, but still compatible with the original Galaksija: ROM C and ROM D. ROM C is available, but I haven’t been able to find copies of the ROM D. More information about the Galaksija Plus is available in the Galaksija Plus section below.
In terms of flashing the ROMs, 2732 EPROMs are somewhat difficult to burn using cheap EPROM programmers like the TL866II Plus. You may have issues with the programming voltage for the 2732A EPROMs which require 21V when programming (there are some simple mods that will let you use 21V). 2732Bs are easier, since they only use 12V when programming.
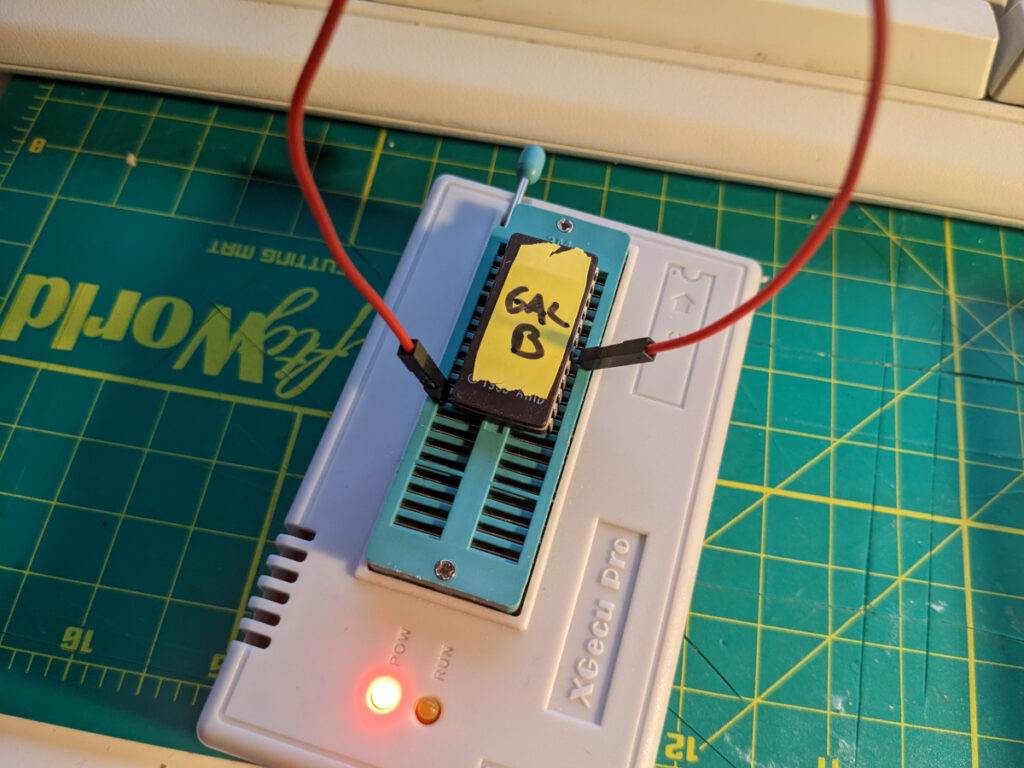
However, I’ve also ran into some problems with the programming pulse required by the 2732 (50ms) when using TL866II Plus. Because of this, the flashing will only write a few bytes at a time. While I’ve previously been able to get around this by writing a script that flashes the ROM about 1000 times (check my original post about my experience building a Galaksija), there is a much easier way to do it by connecting pins 18 (/CE) and ground (pin 12) while the EPROM is in the TL866II programmer. Once you make this connection, the flash will succeed in a single go.
Your mileage may vary. Like always when using old 2732 and 2716 EPROMs, I recommend getting a few extra ones just in case.
ROM A
- ROM A version 28 – original ROM A before ROM B was available
- ROM A version 29 – updated ROM A with automatic loading of ROM B
- the listing of the original ROM A version 28 with Voja Antonić’s comments, published as GALA005052. Kindly provided by Paolo Gigli
- Galaksija ROM A dissasembly by Tomaž Šolc (in English)
- the original Galaksija software guide published in Računari u vašoj kući Issue 1, covering ROM A functions
ROM B
- the original ROM B
- ROM B with reverted screen position fix. The original ROM B moved the image position to the right. This worked well with TVs, but may not fit well on a monitor.
- the original ROM B listing (complete)
- the original ROM B guide published in Računari u vašoj kući Issue 3.
Character generator ROM
While the character ROM hasn’t changed after release, different computer versions came with different logos. A number of companies were involved in production and distribution of Galaksija parts, but three companies actively participated in Galaksija branding:
- Elektronika inženjering
- Mipro (Voja Antonić’s company)
- Zavod za udžbenike i nastavna sredstva
Elektronika inženjering and Mipro featured their respective logos at the Galaksija READY prompt. I haven’t been able to confirm what determined which character ROMs got which logo. Per Dejan Ristanović, all the EPROMs sent to Računari u vašoj kući offices to be programmed by Voja Antonić were programmed with the Mipro logo, while the factory made Galaksijas shipped with the Elektronika inženjering logo. Most character ROMs available online feature the recognizable Elektronika inženjering logo, but I generated one with Mipro’s logo as well for historical reasons. The first to document this online was Tomaž Šolc who also published the comparison below:
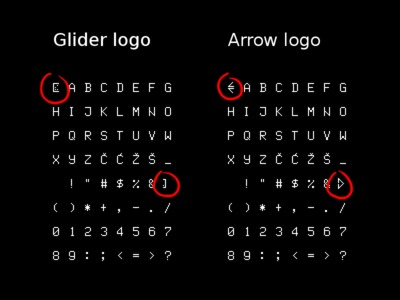

Mipro logo

Elektronika inženjering logo
Read this article for more information on generating your own logo and creating new characters for the Galaksija.
ROM C
- ROM C
- ROM C listing (kindly provided by Hindicki Ferenc)
- a scan of the article about ROM C in Svet kompjutera
ROM D
Video output
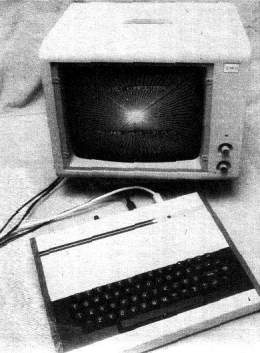
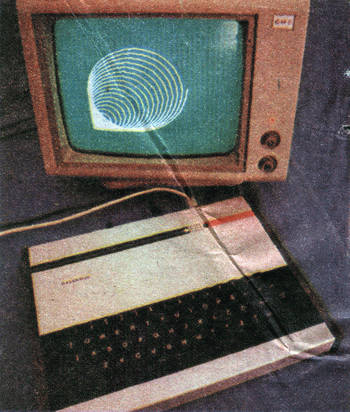
Galaksija was designed with both composite and RF video output. While you can place an RF modulator on your Galaksija and use it with an old TV, you will likely only use composite output. Note that Galaksija uses PAL timings since it was designed for use in Europe! If you don’t have a PAL TV or monitor, you can use a composite to HDMI converter, but note that many cheap ones you can get on Amazon produce an unstable PAL image. This is due to the use of a 6.114Mhz oscillator which produced an image slightly out of line with the PAL standard. I’ve had a great experience with a Retrotink 2X-MINI (pictured above). If you have an NTSC monitor with composite input, you can also use a PAL to NTSC converter, or you can try using it without an adapter, since Galaksija outputs a black and white image.
Power supply

Galaksija uses a 5V power supply, with optional 12V needed for an RF modulator if you decide to include one. The original design and instructions included a schematic for building your own PSU with both 5V and 12V, assuming 220V input (since Galaksija was designed for use in Europe). The power supply design and instructions are included in the translated Galaksija instructions.
Since we have cheap and reliable 5V power adapters now, there is probably no need to build this yourself. I’ve used off the shelf 5V 2A power adapters like this one.
Software and emulation
Galaksija used cassette tape to store programs. To learn more about how the Galaksija uses tapes, read this post by Tomaž Šolc.
The best online resource for Galaksija programs and games is retrospec.sgn.net. Most programs are available as gtp files which you can load into emulators, or convert to wav for loading on a real Galaksija.
Gtp files are supported in MAME. To convert WAV files saved from a Galaksija to gtp files for storage, see my dump2gtp tool on GitHub.
Miodrag Milanović’s galtape utility is the best tool to convert WAV files to gtp files.
Loading tape programs on the Galaksija
To convert to wav files for use with a real Galaksija, use gtp2wav available as part of Tomaž Šolc’s Galaksija development tools. Once you have converted programs to WAV, you’ll need to connect your computer or another audio playing device to the Galaksija via audio cable. On the 2020 double layer board, the 3.5mm jack is connected to the right channel for loading (labelled KU) and the left channel for saving (labelled KI) to tape. Check the common problems section for help getting the tape interface working.
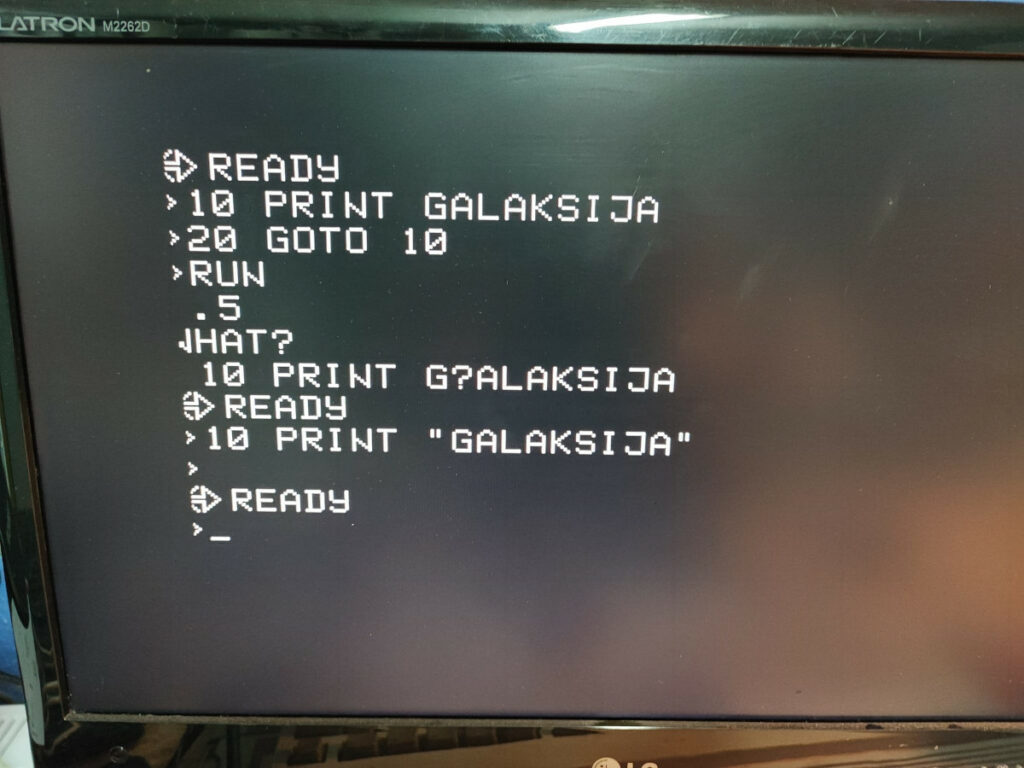
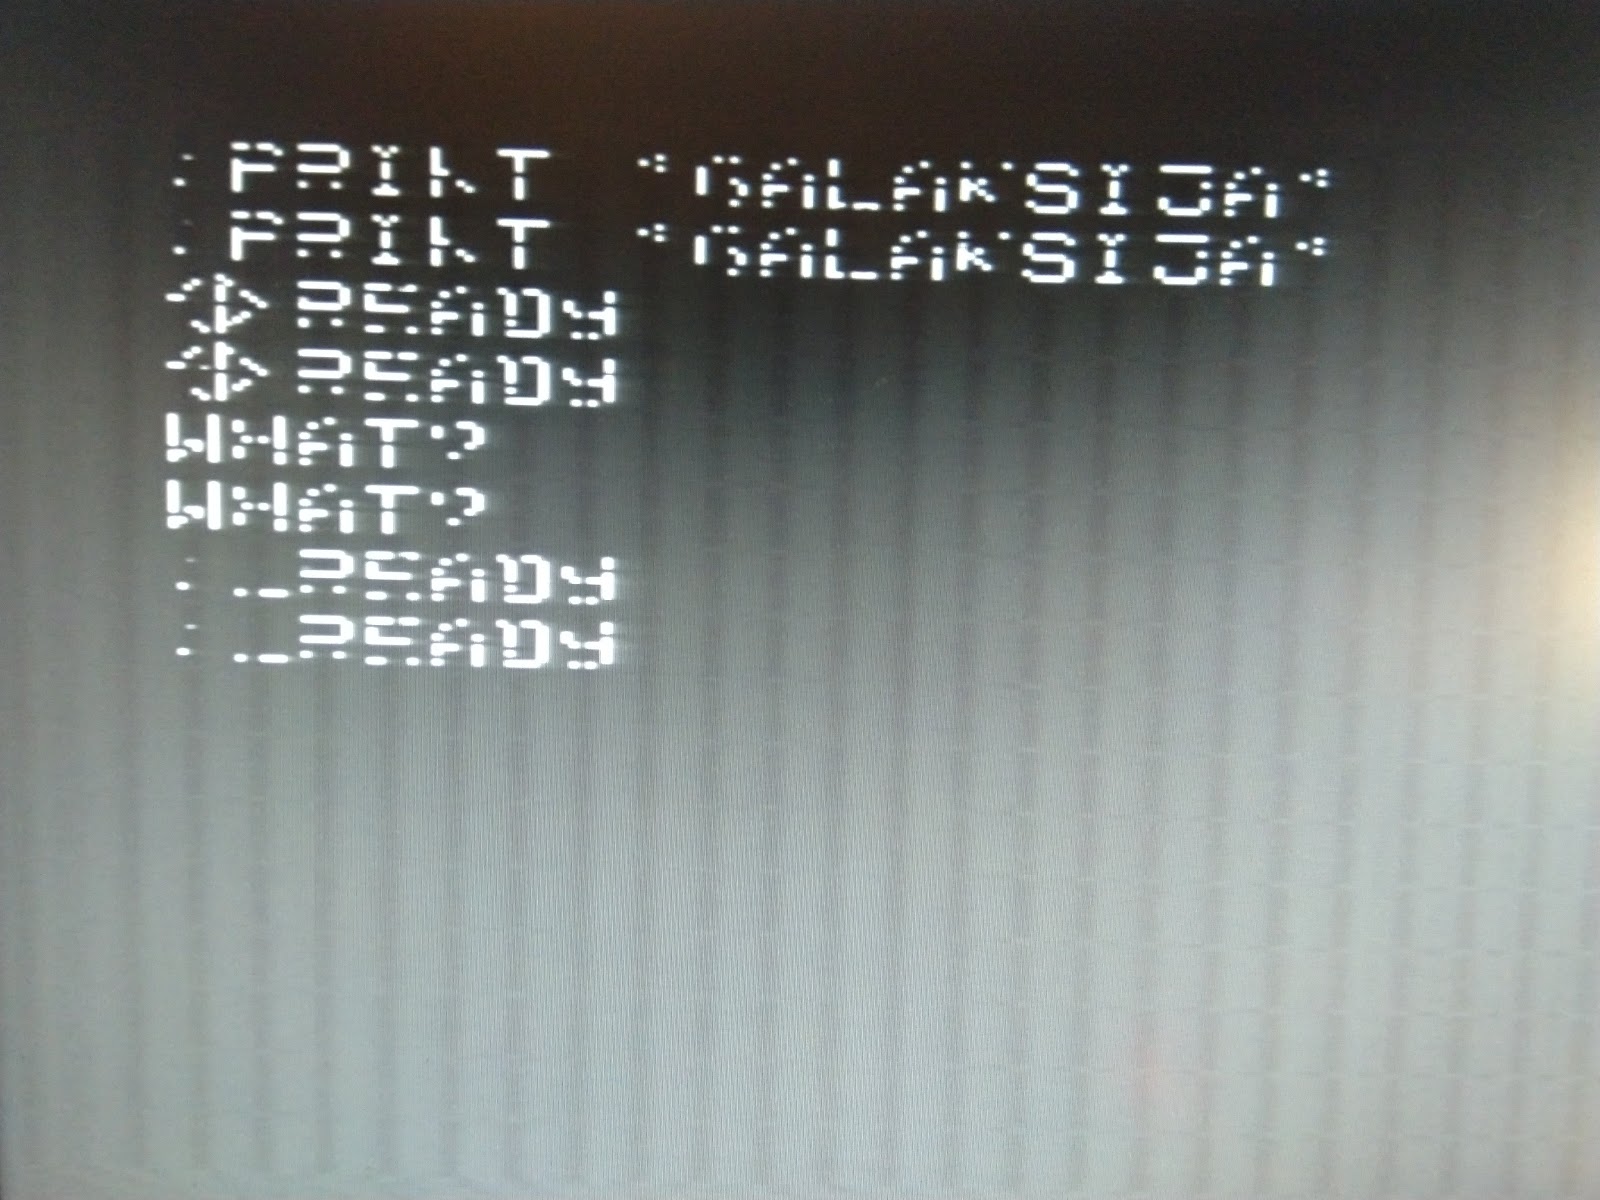
When you’re ready to load your program, type OLD
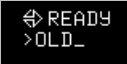
Galaksija will turn off the screen while the tape is loading and you won’t have any feedback until it has been loaded. In case of verification problems, you will get the WHAT? error message. If the tape loads correctly you will get the READY prompt. If the tape doesn’t load at all, Galaksija will stay on the empty screen until it is reset.
Tape commands:
OLD – loads program from tape
OLD? – verifies the program from tape against the program in memory, useful for verifying successful save to tape
SAVE – saves program from memory to tape
Emulators
- Galaksija is well supported in MAME. You can use this zip file with the 3 roms in MAME.
- GalaxyWin emulator for Windows.
- Galaxy – DOS emulator for the Galaksija. Download zip from here
- Galaksija.net is a browser emulator running the Galaksija Plus version of Galaksija written by Dragoljub B. Obradović
- Jsgalmin – Both Windows and browser emulator with Galaksija Plus support, written by Hindicki Ferenc. The emulator is included in a large zip file with a huge amount of Galaksija materials that can be browsed as an offline webpage (start by opening index.html)
- Galaksija – for Sinclair ZX Spectrum 128k
- Galaksija Emulator – for SAM Coupé
More information about Galaksija software is available in my Building a Galaksija Part III blog post.
Memory map
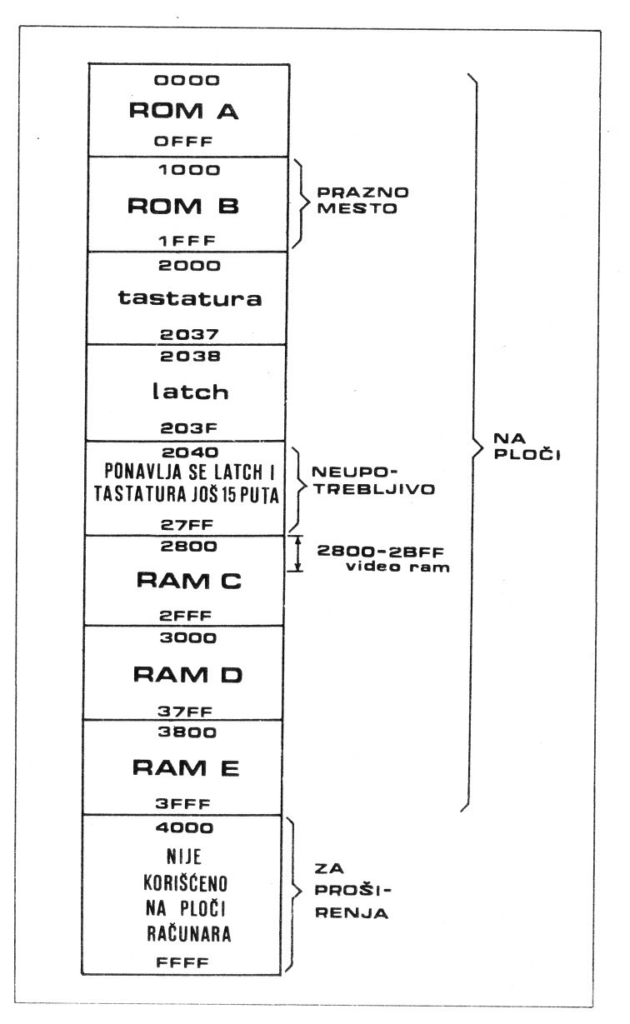
- $0000…$0FFF — ROM A – 4 KB contains bootstrap, core control and Galaksija BASIC interpreter code
- $1000…$1FFF — ROM B – 4 KB (optional) – additional Galaksija BASIC commands, assembler, machine code monitor, etc.
- $2000…$27FF — keyboard and latch
- $2800…$2FFF — RAM C: 2 KB ($2800…$2BFF – Video RAM)
- $3000…$37FF — RAM D: 2 KB
- $3800…$3FFF — RAM E: 2 KB
- $4000…$FFFF — unused, for extensions
Case

The original Galaksija instructions in Računari u vašoj kući suggests using plain PCB material (fiberglass) to make the case. I designed a case in SketchUp that follows this design closely, but which is ready to be 3D printed.
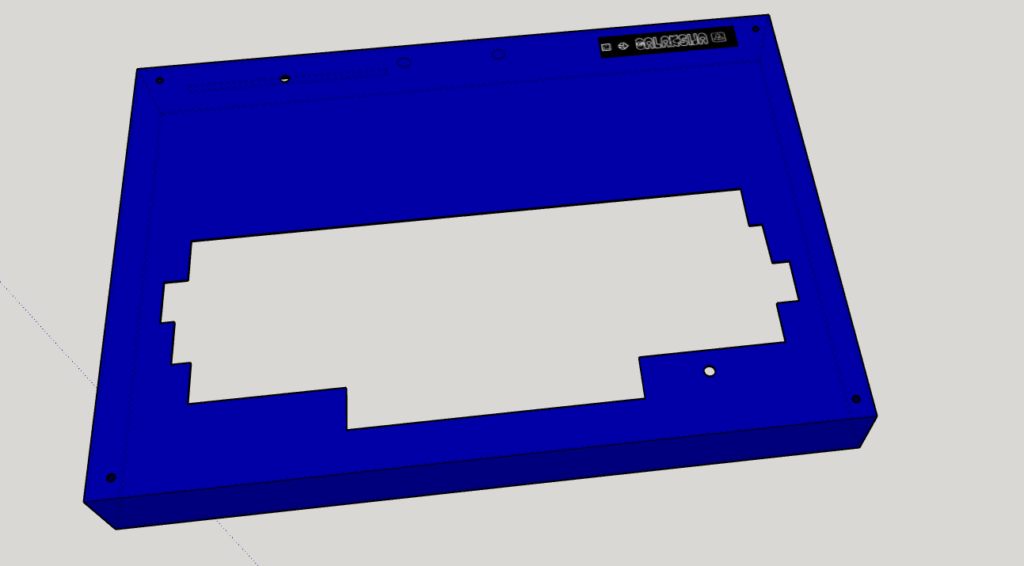
- the design assumes a plexiglass base with standoff screws (4)
- 2 LED holes
- 2 reset button holes (1 NMI, 1 full reset)
- 1 power jack
- 1 power switch
- 1 3.5mm jack
I strongly suggest you measure your Galaksija, especially the keyboard, and make adjustments for I/O ports. Overall dimensions should be compatible with all original PCB designs.
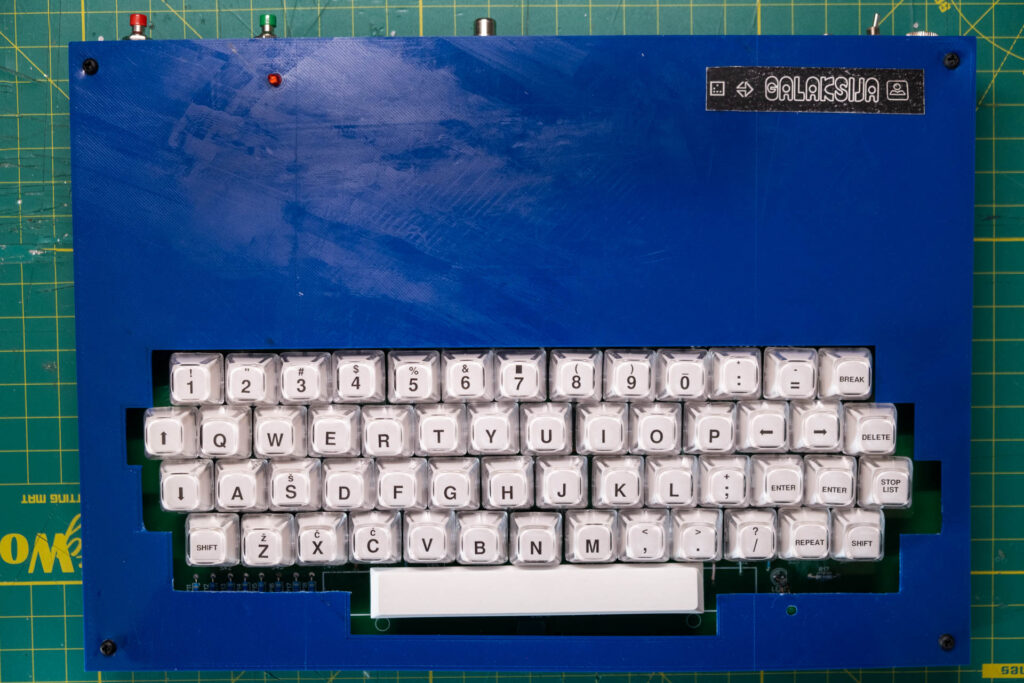
Key switches
Original single layer PCB
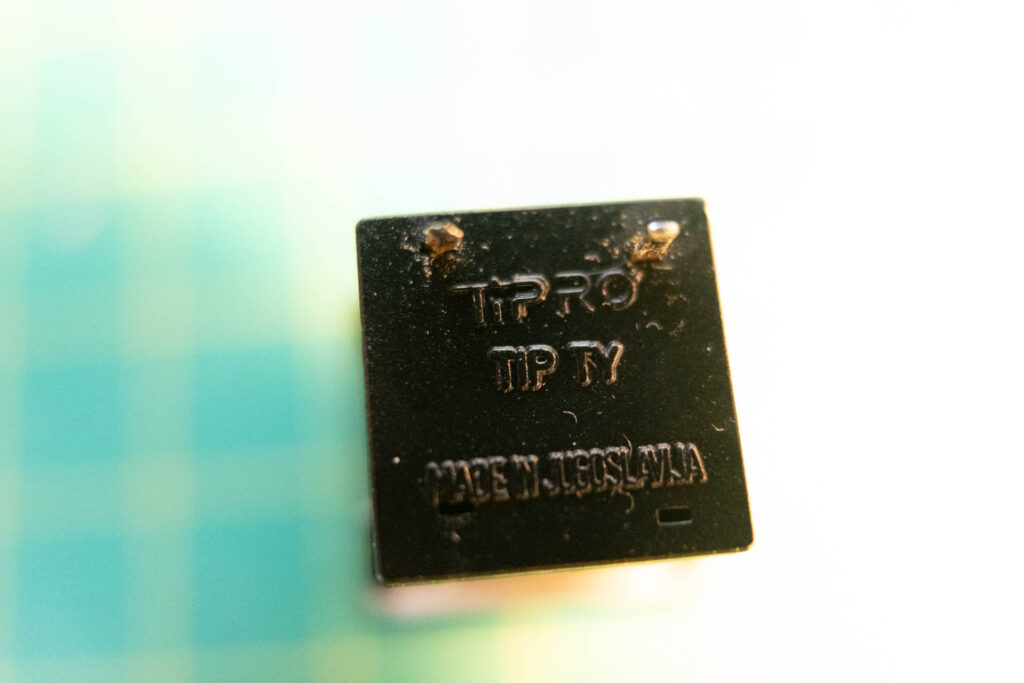
More information about key switches for the single layer Galaksija is available in my post about IEVT TY switches.
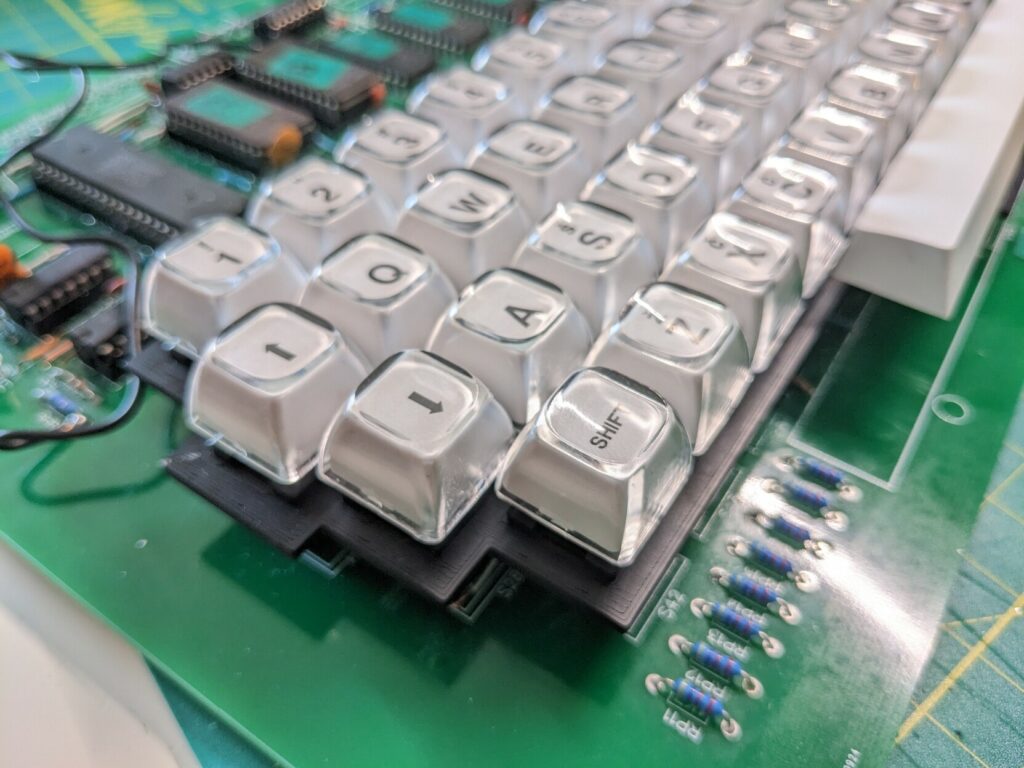
Back in 1984, key switches were among the parts that the Računari u vašoj kući magazine offered to folks as part of their kit (along with the PCB, keycaps and the keyboard plate). The key switches were manufactured by Inštitut za elektroniko in vakuumsko tehniko (IEVT) and the type used was IEVT TY (the same type was used in the Yugoslav Orao computer). This key switch is a version of the SMK J-M0404 which was used in some Apple //es and other popular microcomputers in the 80s. Slovenian company Tipro took over production of these switches after 1985. Tipro was privatized in 1991 when many publicly owned companies in the former Yugoslav states were privatized. Tipro’s TY switches are documented on Deskthority as Tipro SMK Style.
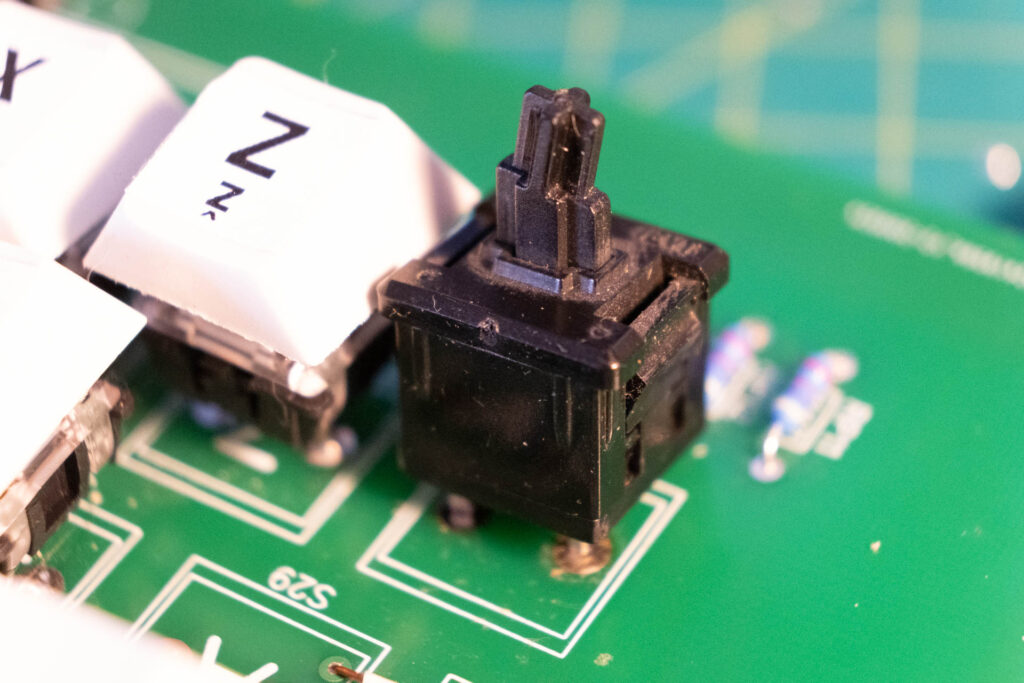
IEVT TY switches are extremely rare, and even SMK J-M0404 and other compatible SMK switches are difficult to find. One option is finding another computer or keyboard with SMK switches, or you can alternatively search eBay for folks selling SMM J-M0404 replacements for Apple //es, but they tend to be rather expensive per switch. Alternatively, you can also get modern SMK style replacements like these ones. You will need 54 key switches. It’s also recommended to use a keyboard plate with SMK switches, like in the original design – check the keyboard plate section below for making your own.
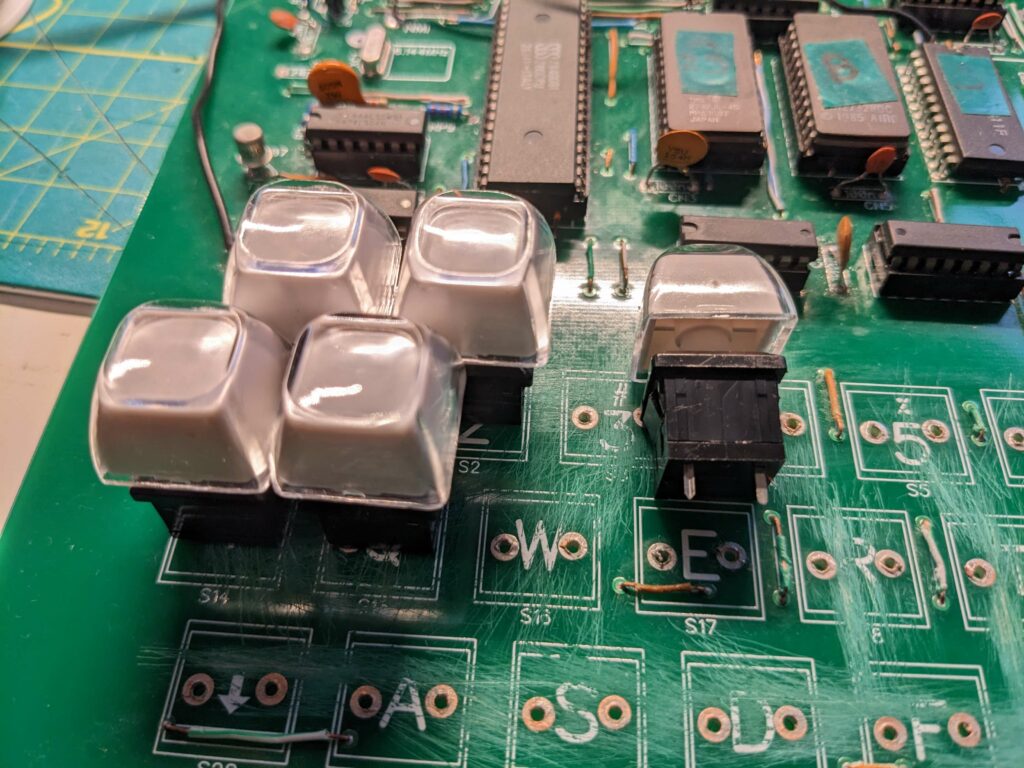
Important note: if you are using a single layer board based on the demerzel/spetsialist-mx.ru gerber, you will likely have to drill the key switch connector holes to widen them enough to fit the SMK J-M0404 connectors. Also note that the connectors should be mounted on the bottom of the keyswitch (not in the middle, as indicated by the outline).
2020 two layer PCB
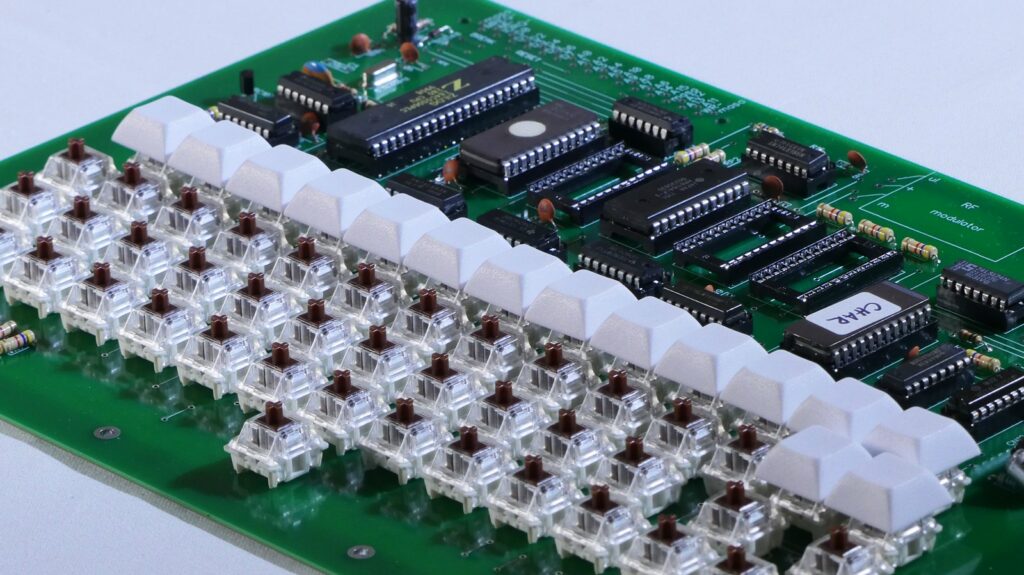
The 2020 double layer PCB is Cherry MX compatible with PCB mountable key switches, so a wide variety of switches and caps are available. In my BOM, I recommend Cherry MX Blue Switches PCB Mount and ABS ADA Keycap Set – Film Never Dies caps. You will need 53 key switches (1 less than the single board design because the double layer board uses a single switch for the enter key).
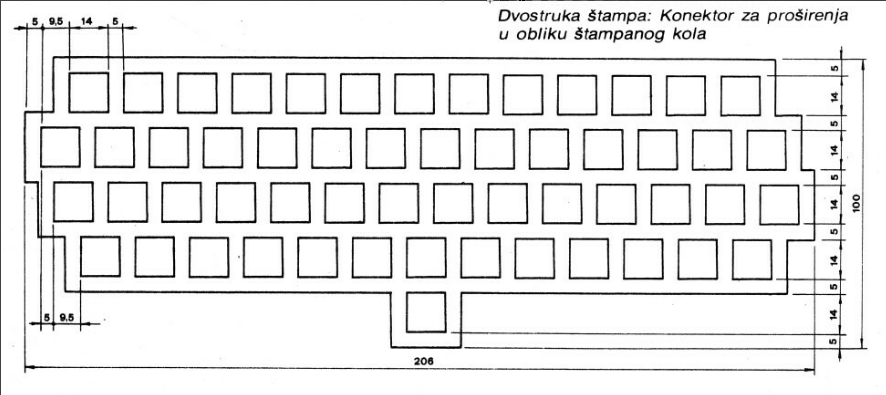
Keyboard plate
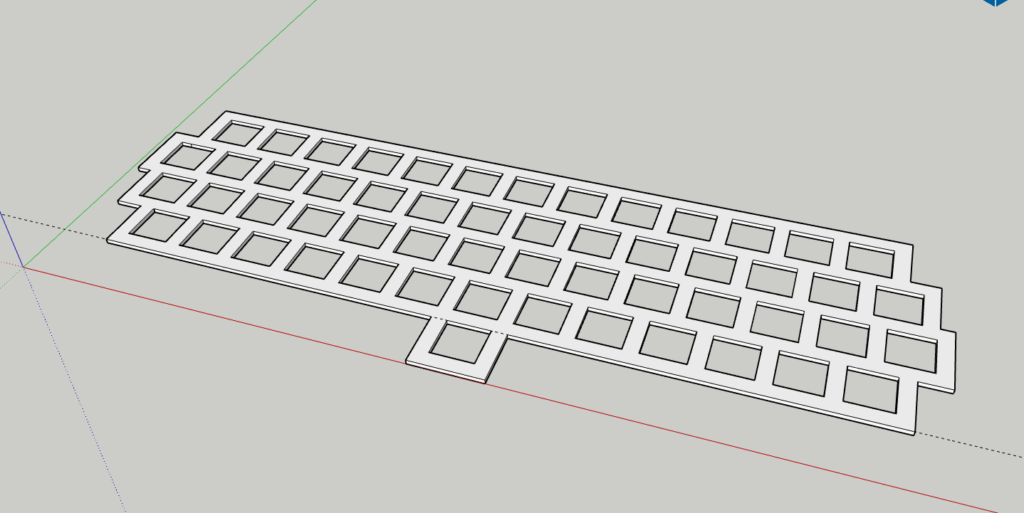
Since the SMK key switch type is plate mounted, it requires a plate which was provided as part of the kit, but plate design was also published in Računari u vašoj kući. I designed and manufactured a 3D print of the keyboard plate, which you can download from my GitHub as both a Sketchup or STL file for printing.
Expansions
There were at least a dozen expansions for the Galaksija back in the 80s, mostly homebrew, and many of which were developed by Voja Antonić himself. In 1985 the Galaksija Plus project implemented many of those expansions (like the upgraded memory, sound, improved graphics etc.) into a new board design. Below are a few expansion projects that we have designs for:
- Centronics (parallel) interface (article by Voja Antonić)
- Design published in October 1984 issue of Svet kompjutera
- EPROM programmer (article byJova Regasek)
- Design published in Issue 2 of Računari u vašoj kući
- Memory expansion (article byJova Regasek)
- Design published in Issue 2 of Računari u vašoj kući
- Translated article (translation by me)
- TTL/CMOS logic tester (article by Voja Antonić)
- Design published in January 1985 issue of Svet kompjutera
- Tone generator (article by Mihajlo Tešević)
- Design published in Issue 4 of Računari u vašoj kući
- Tone generator 2 (article by Nenad Dunjić, Nenad Balint and Milan Tadić)
- Design published in April 1986 issue of Svet kompjutera
- Improved graphics (article by Nenad Dunjić and Milan Tadić)
- Description published in Issue 5 of Računari u vašoj kući
- Design published in Issue 6 of Računari u vašoj kući
- Galaksija Plus upgrade
- Galaksija Plus was an improved Galaksija design by Nenad Dunjić, Milan Tadić and Nenad Balint in 1985, it included popular expansion projects like the expanded memory, sound support and improved graphics. More information about the Galaksija Plus is available in the Galaksija Plus section below
- Starting in January 1986, Svet kompjutera published a series of 4 articles outlining how to upgrade your original Galaksija to the Galaksija Plus model
New expansions
There have been a few modern projects for the Galaksija.
- Galaksija Keyboard Interface – Marko Šolajić’s project, useful for the Galaksija Plus clone and other designs that don’t include a keyboard
- The Galaxino – program loader interface for the Galaksija that can play software recorded in GTP and WAV format. Designed by Michele Perniola from Apulia Retrocomputing
Common problems

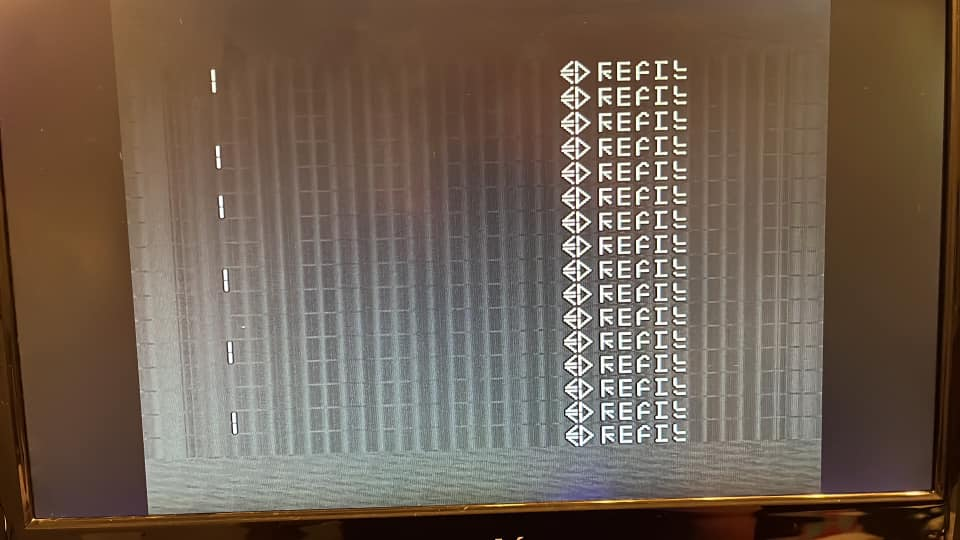
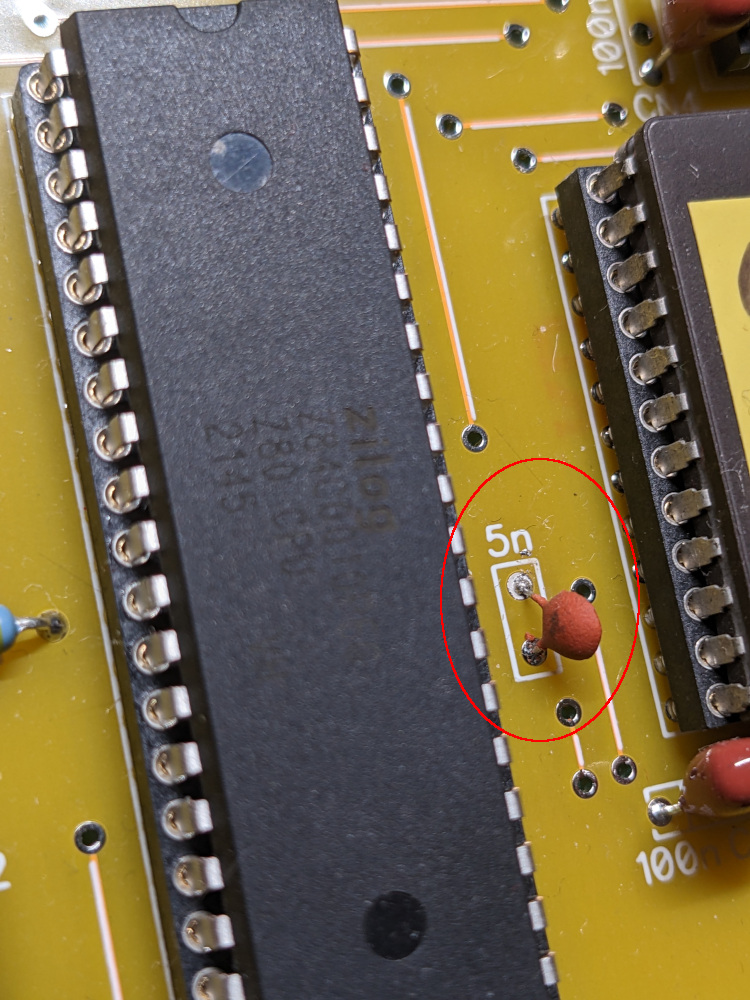
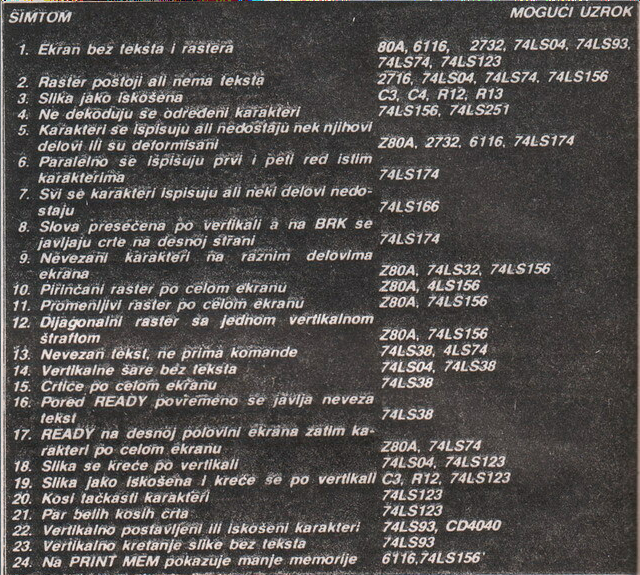
- CMOS Z80A signal timings: If you are building a 2020 double layer PCB using a CMOS Z80A you will need to add a capacitor between RFSH and GND pins on the Z80A. There is a spot for a 5nF capacitor right next to the Z80A. If you experience issues with the image having problems with the first row of letters (issue #1 above), or the image being moved around the screen (issue #2 above), try different values for this capacitor, like 3.3nF or even as low as 470pf (0.47nF) until you get a good image. Look here for one example of this issue, and here for another. Read this article for a more thorough background on this issue and an alternative way of dealing with it by building a small circuit
- Image overscan: Depending on your screen, you may have overscan issues where a part of your video output is not showing up on your screen. This is a distinct issue to the Z80A timings adjustment outlined above. To move the image in software, issue:
BYTE &2BA8,12where 12 is the default screen position. Change to 11 to move the image to the left, or 13 moves it to the right. Once you find what works well, you can make that adjustment permanently in ROM B. For a permanent fix, you’ll need to change the value of address 1024 in ROM B to correspond to the number that works well for you (11, 12, 13 etc…). In the original ROM B it is set to “0C” in hex, decimal 12. If BYTE &2BA8,13 worked better for you, then it should be 0D (hex for 13) etc. On my github I have a few versions of ROM B with different values for &2BA8
- Memory issues: Sometimes memory issues will show up as problems in video generation. If you’re using cheap sockets with the RAM chips you may experience issues. I recommend using higher quality sockets, at least for the RAM. You can read about my experience with this issue here
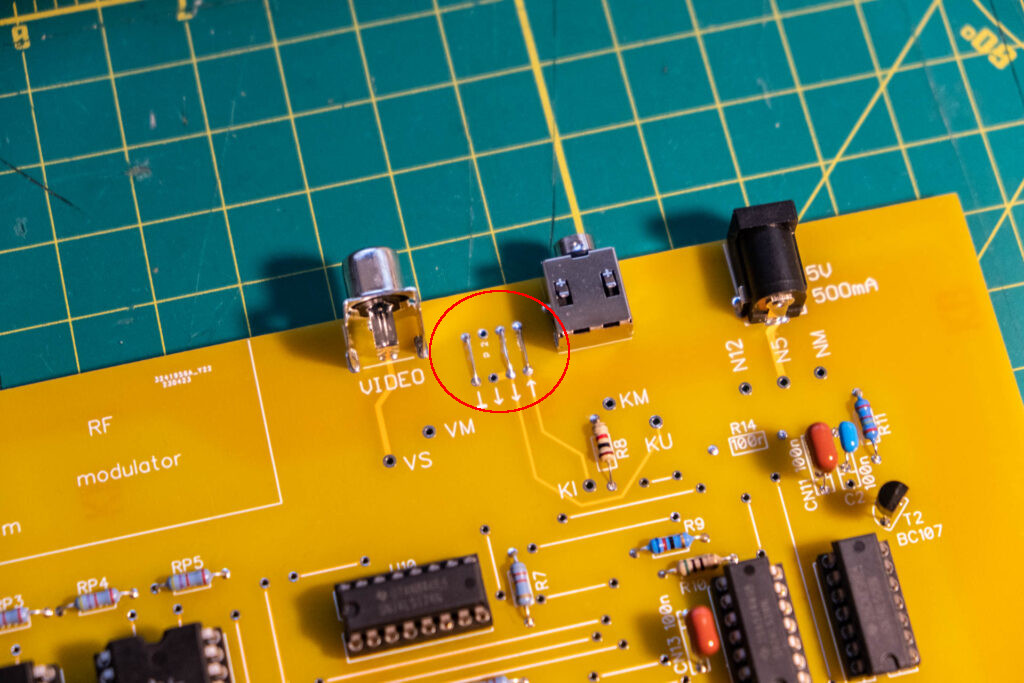
- Issues loading from tape: When building a 2020 double layer PCB version, make sure you solder 3 jumpers for the 3.5mm jack (in between the RCA jack and the 3.5mm jack). If you’re having trouble loading even after you add them, try replacing R14 with 1kohm resistor, and C2 with 1uF capacitor (105 ceramic) – both should be changed at the same time! This is likely caused by using modern transistors which are faster, so changing the resistor + capacitor prolongs the impulse from the tape. Alternatively, you can also try taking out the R14 resistor and leaving the 0.1uF capacitor in place, but this works not as well as replacing both the capacitor and the resistor
Galaksija builds
Here a few examples where folks have documented their process of building their Galaksija.
- Building A Galaksija, Part I: The Tech – the first part of three articles about my experience building a single layer Galaksija
- MCbx Old Computer Collection – single layer Galaksija build log on oldcomputer.info. A neat build including a homemade PCB
- Building the Galaksija on YouTube – Hristijan L recorded himself building a 2020 double layer Galaksija in a series of videos
- Building the Galaksija Plus Computer – Retro Bertie’s video about building a Galaksija Plus clone
- Making a Galaksija – Galaksija plus clone build log on kernelcrash.com
Galaksija Plus
Svet kompjutera
There are many references to the Galaksija Plus and its clones online and in this FAQ document, but the history of the Galaksija Plus is not well documented. “Galaksija Plus” refers to both hardware improvement projects (as outlined above in the Expansions section), as well as a commercial model that was offered for sale.
Galaksija Plus was an improved Galaksija design by Nenad Dunjić, Milan Tadić and Nenad Balint in 1985, it included popular expansion projects like the expanded memory, sound support and improved graphics. Galaksija Plus was described in issue 8 of Računari u vašoj kući magazine (October 1985), October 1985 issue of Svet kompjutera and November 1985 issue of Svet kompjutera.
Starting in January 1986, Svet kompjutera published a series of 4 articles outlining how to upgrade your original Galaksija to the Galaksija Plus model.
There are multiple Galaksija Plus clones (as outlined above) and emulators like MAME support it as well (use this zip file).
Additional resources
- Hacking the Digital and Social System – Voja Antonić’s article on Hackaday about the origins of the Galaksija computer
- How to use more than 100% of program memory – Voja Antonić’s updated 2020 double layer Galaksija PCB design
- Building A Galaksija, Part I: The Tech – the first part of three articles about my experience building a Galaksija
- Building A Galaksija, Part II: The Origin Story – the second part of three articles about my experience building a Galaksija
- Building A Galaksija, Part III: Audio Cassettes, Magazine Listings And Radio Waves – the third part of three articles about my experience building a Galaksija
- Revolution During Disintegration: Lessons from a Short History of Yugoslav Computing (HOPE 2022) – a recording of the talk I gave at A New HOPE conference on 7/24/2022 in NYC.
- My Galaksija github repo – features most of the files referenced in this post
- Galaksija programs on retrospec.sgn.net
- Tomaž Šolc’s series of posts about the Galaksija – Tomaž Šolc documented many in depth technical aspects of the galaksija, including the video generator circuit, character generation, and more (in English)
- Tomaž Šolc’s Master’s Thesis on building a CMOS Galaksija replica (in Slovene)
- Tomaž Šolc’s Master Thesis on building a CMOS Galaksija replica (English translation work in progress)
- 29C3: The ultimate Galaksija talk – Tomaž Šolc’s talk about the Galaksija at Chaos Communication Congress in 2012
- Galaksija talk at KiberPipa hackerspace – Tomaž Šolc’s talka bout the Galaksija (in Slovene)
- Tomaž Šolc’s Galaksija development tools
- Galaksija ROM A dissasembly by Tomaž Šolc (in English)
- A Galaksija Not So Far Away: The Story and Legacy of the Galaksija Computer – an episode of the Remembering Yugoslavia podcast featuring Voja Antonić, Dejan Ristanović and myself
- Galaksija documentary film (in Serbian with English subtitles)
- Galaksija Replica Project – description of the Apulia Retrocomputing Galaksija replica project
- Apulia Retrocomputing documentation – documentation files for the Apulia Retrocomputing Galaksija replica project
- Il ritorno del #Galaksija! [Galaksija is BACK!] – Youtube video about the Galaksija replica project at Apulia retrocomputing (in Italian with English subtitles)
- The Ages of Galaksija – a short documentary film by Guido Cauli in partnership with Apulia Retrocomputing (in Italian with English subtitles)
- специалист-пк.рф/Galaksija – the “Russian website about the Galaksija” with gerber files, schematic and ROM files. Originally at spetsialist-mx.ru
- Hindicki Ferenc’s Galaksija offline website – This is a large zip file with a huge amount of Galaksija materials that can be browsed as an offline webpage (start by opening index.html) as well as the Jsgalmin emulator (mentioned in the Emulators section). A live version is available at http://galaksija.epizy.com
- Računar Galaksija – moja priča, Dejan Ristanović – oral history of Galaksija, by Dejan Ristanović (in Serbian)
- Oral History of Voja Antonić – interview with Voja Antonić at the Computer History Museum in Mountain View, CA
- Miodrag Milanović’s galtape utility – the best tool to convert WAV files to gtp files