Edited May 16 2023
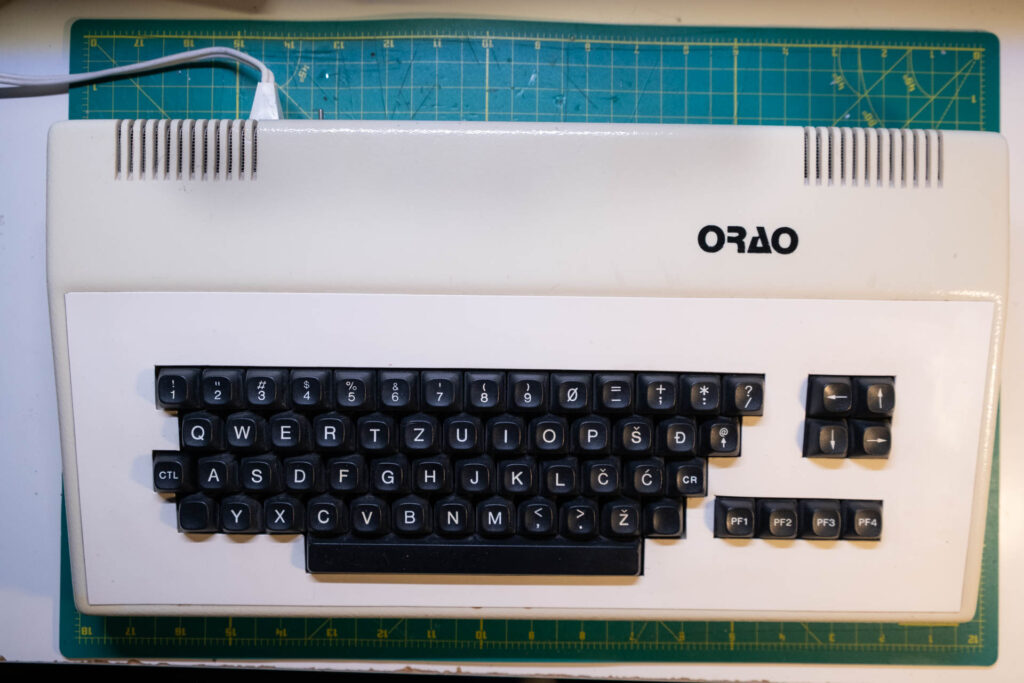
Orao was a Yugoslav 8-bit computer developed by Miroslav Kocijan for PEL Varaždin in 1984. Orao was common in elementary schools, mostly in Croatia, through the late 80s. Since 2021, I’ve been learning more about this microcomputer and developing hardware and software for it. While most of the information here is available on my Orao github repo, this page contains all the relevant information related to the Orao WiFi RS232 adapter, which I developed in 2022.
The Orao has a built in RS232 TX meant for use with a printer, but no built in RX. In order to enable two way serial communication I built a 6551 based RS232 adapter, which was later modified to include a Raspberry Pi Zero W, which serves as an emulated modem, using tcpser. I also wrote a simple terminal emulator that needs to be loaded from tape, called Orao Terminal. Below is a quick list of resources for use with the Orao WiFi RS232:
Hardware:
- PCB Gerbers file
- Parts BOM
- Raspberry Pi SD card image with tcpser installed. Uncompress with unxz and copy to SD card with dd. To connect to WiFi, create a file “/boot/wpa_supplicant.conf” and fill out with your wifi SSID and password:
country=US

ctrl_interface=DIR=/var/run/wpa_supplicant GROUP=netdev

update_config=1

network={

ssid="MY_SSID"

psk="MY_PASSWORD"

}
Software
Instructions
Hardware
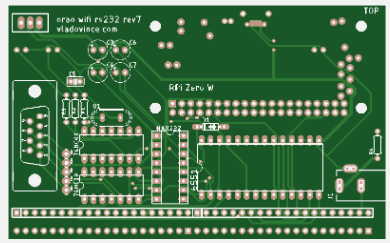
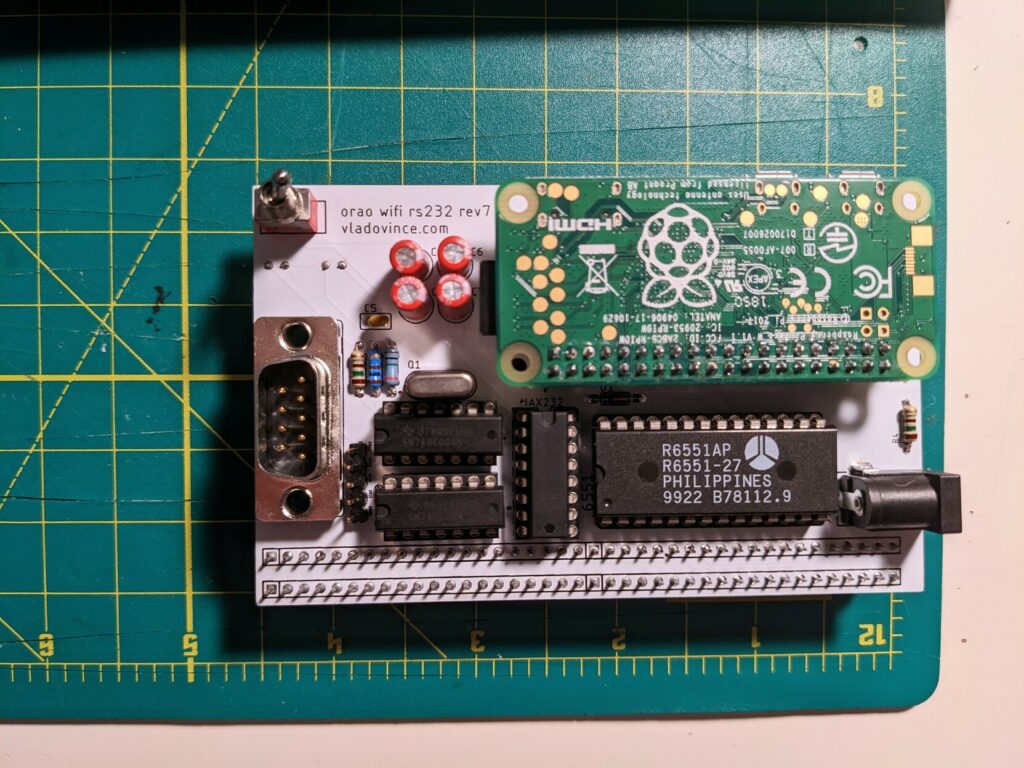
Orao WiFi RS232 is built around the 6551 asynchronous communication adapter (ACIA). The ACIA is placed at memory addresses A000 (data register), A800 (status register), B000 (command register) and B800 (control register). The addresses are decoded with the 74HC10 triple NAND gate, and the RS232 voltage is adjusted through the MAX232 IC. 1.8432Mhz oscillator is used to set the serial bitrate. A Raspberry Pi Zero W can be used to emulate a modem via the tcpser program, but a DB-9 port and an open header with exposed RS232 signals can be used as well. An additional 74HC00 IC is used for the status LEDs and to amplify the PHI2 signal.
Since the Orao doesn’t expose 5V on the expansion connector, an external power adapter is needed. You can either use the barrel jack or a micro USB port to provide 5V DC.
Orao WiFi RS232 has three status LEDs:
• Blue (ON) – lights up when external power is connected
• Red (RXD) – blinks when data is received
• Green (TXD) – blinks when data is sent
Orao WiFi RS232 uses a Raspberry Pi Zero W to emulate a modem, using the tcpser program. In order to communicate with the Orao via the 6551 ACIA, RPi’s UART is directly connected to the 6551 (since it uses TTL levels). While the Pi Zero W works the best because of the size, you can also use any regular size Raspberry Pi newer than the Pi 2. Before using a different Pi, check that the pinout is the same as on the Pi Zero.
Orao WiFi RS232 assembly instructions are available here (in BCMS).
Schematic

Software
Orao Terminal supports serial communications over 300, 2400 and 4800 bps. Orao Terminal supports ASCII encoding (instead of the native YUSCII encoding normally used on the Orao).
The program is fully written in 6502 assembly. It’s loaded from BASIC using the LMEM “” command.
Afterwards, you can choose the mode:
- WiFi Modem
- RS232
Selecting WiFi modem will set the speed to 4800 (default used by the Raspberry Pi Zero W in modem emulation mode). Selecting RS232 will show another menu with additional speeds.
Notes:
Since the Shift key functionality is not implemented yet, the 4 PF buttons have the following uses:
Shift key has now been implemented and works as it should with capital letters and symbols. Functions for the PF buttons are below:
PF1 = clear screen
PF2 = not currently implemented
PF3 = not currently implemented
PF4 =not currently implemented
The program uses hardware CTS/RTS flow control. Flow control is necessary because of the limited screen space. Flow control will automatically stop RX once all 32 rows are filled. Pressing the CR button will clear the screen and continue receiving data.
At 4800bps, some responses from tcpser might be too fast (e.g. responding OK to AT command). This only applies to responses immediately following pressing CR. Lowering speed to 2400 or 300 may resolve this issue.
Edit: issues with fast responses have been resolved in Orao Terminal versions 0.32 and higher.
Raspberry Pi Zero W prep
You can download the Raspberry Pi SD card image with tcpser installed. Uncompress with unxz and copy to SD card with dd. To connect to WiFi, create a file “/boot/wpa_supplicant.conf” and fill out with your wifi SSID and password.
On a fresh installation, the following steps need to be performed on the Raspberry Pi:
- Download the Raspberry Pi OS Lite from raspberrypi.org
- Raspberry Pi OS images now come compresed as .img.xz. You can use unxz to decompress the .img
- Insert the SD card and copy the image using dd
- When the image is copied, mount the /boot partition on your computer
- First we need to create a new account. As of 2022 the default pi/raspberry account is no longer active on the default Raspberry Pi OS image
- Generate an encrypted version of your password using openssl (here “orao2022” is the desired passowrd
echo 'orao2022' | openssl passwd -6 -stdin- Create a file “/boot/userconf” and enter your credentials in the format “username:encrypted- password”, e.g.:
pi:$6$mc1/HL5CSKUJcfgL$.6Il3lJOs9uKRfFJqvmJwaHU8n3A3OOKqj.abb.eAf0/nR.B8urz4KJnDDMIgaciBvGhEon7nH1HRZC.2EKLD1- This will create a user “pi” with password “orao2022”
- Now we need to enable SSH. Create a file “/boot/ssh”
- To connect to WiFi, create a file “/boot/wpa_supplicant.conf” and fill out with your wifi SSID and password:
country=US
ctrl_interface=DIR=/var/run/wpa_supplicant GROUP=netdev
update_config=1

network={
	ssid="MY_SSID"
	psk="MY_PASSWORD"
}- Lastly we should enable the built in UART and disable Bluetooth (because RPi uses the UART for BT communication by default). Edit /boot/config.txt and add the following two lines:
enable_uart=1
dtoverlay=disable-bt- We can now put the SD card into the Pi and boot it up
- The first boot might take a bit longer
- Once the Pi is powered on, you can check your router for its IP, or use nmap. Once you have the IP, SSH into the Pi using the pi/orao2022 credentials (or whatever you used)
- We should first run raspi-config and set the locale so we don’t get any errors
- Run sudo apt-get update, and then sudo apt-get upgrade so we have all the updates
- Once the updates are installed, we need to install tcpser, rpirtscts and telnetd
- First install git with sudo apt-get install git
- Then install tcpser:
git clone https://github.com/FozzTexx/tcpser.git
cd tcpser/
make
sudo cp tcpser /usr/bin- Now let’s install rpirtscts. This utility is needed to enable hardware flow control on the built in UART
wget http://ftp.podsix.org/pub/pimodem/mholling-rpirtscts.zip
unzip mholling-rpirtscts.zip
cd rpirtscts-master
sudo cp -p rpirtscts /usr/local/bin- Lastly, let’s install telnetd. Running a telnet server on the Raspberry Pi will let us control the Pi directly from the Orao by using the ATDT127.0.0.1 command. Use telnet on a networked device at your own risk.
sudo apt-get install telnetd- We should now add the following two lines to /etc/rc.local to automatically start tcpser and rpirtscts on boot. The lines should be added after fi, but before exit 0
/usr/local/bin/rpirtscts on
tcpser -d /dev/ttyAMA0 -s 4800 -tsS - We can now shutdown the Raspberry Pi and install it on the Orao WiFi RS232. If we ran all the commands correctly, it should start in modem emulation mode and we should be able to use it to connect to networked resources using ATDT and other common modem commands

Acknowledgments
This project is a result of many hours of work, but also at least a dozen other projects that served as inspiration or direct resources that helped me make the Orao WiFi RS232. They are listed here in no particular order:
- Josip Perušanec’s Orao 2007 clone – before I obtained a real Orao computer, I put together a fully functional Orao clone designed by Josip Perušanec in 2007. His project is available here. I built my first Orao hardware project back in 2021 in order to use a PS2 keyboard with the Orao 2007 clone. Documentation of that project is available on my Orao github repo
- The late Lee Davison’s 6551 circuit, hosted by Hans Otten, was my initial inspiration on how to build this adapter
- I also referenced Dirk Grappendorf’s blog post about implementing 6551 in his home computer
- Another resource I referenced is Michael Billington’s blog post about the 6551. This post was especially useful for me to understand how to implement address decoding
- Steve Mansfield-Devine’s blog post about implementing the 6551 for his Zolatron computer was very useful too, especially to understand the differences between different 6551 chips
- Manuals and books about the Orao computer were indispensable, especially the two books published online by RetroInfo fairly recently. These resources are only available in Croatian. All the materials I used are hosted on my github.
- Željko Perić’s Orao Basket. Željko’s set of Orao development utilities was very helpful in writing the Orao Terminal emulator, especially the assembler program and the bitmap image converter
- tcpser – this handy modem emulator utility is what makes the Orao WiFi RS232 useful. I used this particular fork of the program originally written by Jim Brain
- Vince Weaver’s explanation of the built in UART on the Raspberry Pi was very helpful
- Matthew Hollingworth’s rpirtsrtc enabled me to use flow control on a Raspberry Pi
- Big thanks to Juraj Mucko who kindly gifted me two fully functional Orao computers
- Shout out to PEEK&POKE museum in Rijeka where I got to see the Orao for the first time. Visiting PEEK&POKE is what got me interested in vintage Yugoslav computers in the first place
- And lastly a thank you to Miroslav Kocijan who designed the Orao back in 1984!